Difficulty: ** (out of 5 stars)
Time: 6.5 Hours
Tools: Phillips Screwdriver, Jack, Jack Stands, 13mm Socket, 3 long extensions, Universal Elbow Attachment, Ratchet, 5/8" Socket, Allen Head Socket, Torx T-30, Flashlight, Rubber Mallet, Torque Wrench.
*Note - Every 60,000 miles : water pump + thermostat should be replaced. Every 90,000 miles : Radiator, Expansion Tank, Fan Clutch and Plastic Cooling Fan
Credits to : pimpin325ci via Bimmerforums.com
***
REMEMBER to make or distinguish in some way ALL of the parts, bolts, nuts, and clips that you remove for easy re-installation with zero problems. Also make note of every sensor plug and whatever else that you unplug or remove so that you remember to put them back during re-installation.***
The car is a 2001 325Ci. The parts used are: ECS Tunning Level II Cooling System Refresh.
Parts Purchased:
 |
Here's what comes in the Stage II Kit:
Water Pump
Water Pump Pulley
Fan Switch
Thermostat & Housing
Sealing Gaskets
Expansion Tank & Cap
1 Gallon Coolant
Upper & Lower Radiator Hoses
Accessory Drive Belts
Radiator Drain Plug
Coolant Level Sensor
Level Sensor Clip |
Steps (out of 26)
1. First jack up the car on the front, both sides, so that you have access all around, above and below the car. Use stands of course.
 |
| Right hand drive. |
2. Remove the splash guard with a Phillips screwdriver, there are 7 screws, which stay attached to the splash guard.
3. Next take a bucket or pan (use something with a holding capacity of about 5 gallons) and place them under the radiator and expansion tank drain plugs. They are blue circle plugs with a large phillips head. You can use just about anything that will fit in there to un-screw them, but be careful not to damage them as they are plastic. The radiator drain plug you will replace because a new one comes in the kit. The expansion tank drain plug however, you will reuse, it also STAYS in the housing, so do not try to remove it.

4. After those have drained out, move to the engine block drain plug. It is between the two exhaust manifolds up in a pretty easy to access area on the passenger side of the engine. It is easy to see and easily recognizable. You will need a 13mm socket a couple (2 or 3) long extensions and a universal (bendy elbow attachment) in order to get to it with your ratchet. Unscrew this and take it completely out, with your bucket ready to catch the coolant. (coolant will shoot out and hit everything in its path on an angle, so use protection for eyes and mouth).
5. The first thing you will need to take off is your air intake. Disconnect the Mass Air Flow sensor and remove that as well.
6. Remove the air duct that is above your kidney grills. It takes 3 pins that you pry up on the center part and then pry up the while pin clip.
7. Fan removal. Unplug the two electrical connectors on the passenger side of it, pop out the pin clip on the right side, and remove the Torx T-25 screw. After this, simply lift it out.
Once you have the fan out, you will have a lot more room to work in so that you can start removing parts. It doesn't matter which order you remove some of the parts in (unless things obviously have to be removed before you can get to others).
8. Take off your belts. There is a hydraulic tensioner on the main belts and a mechanical one on the A/C belt. For the hydraulic tensioner you use a Torx T-50 bit, put it on the centre bolt of the pulley on the tensioner (after you pop off the dust cap) and turn it CLOCKWISE. Use a breaker bar. This will depress the tensioner, then pull the belt off the pulley. Take out your wrench and pull the belt out.
If you have a mechanical tensioner for this main belt, you just use a 5/8" socket and put it on the "nut shaped" part of the tensioner and turn it away from the belt to release tension.
For the A/C belt, use the 5/8" socket and turn it away from the belt to release the tension. Remove both of the belts.
Remove all the hoses at once. NOTICE if the hose attachments are hard to get off. Spray WD-40 around the fitment and let it soak to loosen it up. Be careful not to damage the plastic attachments that the hoses attach to. Also, the hoses will still have some coolant left in them that will drain out when you remove them.
9. On the upper radiator hose, pull up on the easy release clips, two on the expansion tank side and one on the thermostat side. Don't worry about saving the older bleeder plug because the new hose will have a new one too. Pull the hose out.
10. Remove lower radiator hose. Unplug the sensor attachment from the top of it. This goes to the "fan switch" inside the lower radiator hose, don't worry about saving that either because the kit comes with a new one. Pull up the easy to release clips on both ends of the hose and pull that hose out.
11. Remove the two hoses attached to the expansion tank.
The upper one goes clear to the back behind the engine to the heater core behind the fire wall. You will need to remove your cabin air filter tray to this.
11a. First turn 90 degrees clockwise the three white spring loaded clips. Remove that cover and then your filter.
Take a Torx T-30 (or Allen Head Socket) bit and remove the four screws securing the tray. Pull that up and out. For even more hand room, you may want to remove the back wall behind that. Remove the two other (one per side) Torx screws on the wall and pull that up and out.
You should be able to see two hoses attach into this back wall. The one with the blue ring around it is the one you are going to remove. Take a flat head screw driver and unscrew the clamp, pry this hose off. Pop up the clip on the attachment on the opposite end attached to the expansion tank and pull that off. Pull the hose out.
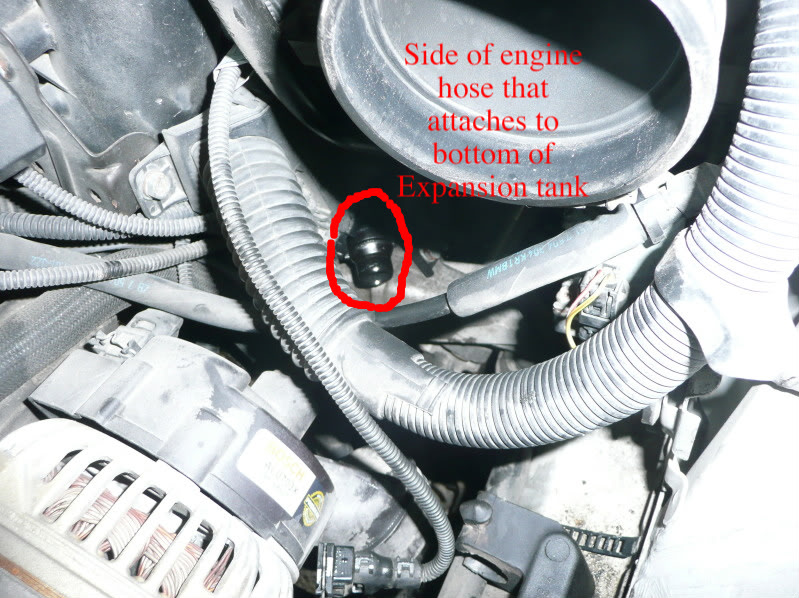
12. Remove the lower expansion tank hose. This hose is short and attaches to the right side of the engine. Pop up the clips on both ends and pull the hose out. You will most likely need to get back under the car to get it off of the expansion tank because it is on the bottom.

13. The next hose is kind of a pain in the ass. The front of it is just an open ended hose with a clamp over it to secure it to the "water inlet valve". Just unscrew this a bit and pull it off. Use a flash light and follow the hose back with your hand, reaching around. It goes all the way back and around to the back of the engine. You may want to remove the right plastic engine cover (the ones with the white groves) because this gives you a little peep hole to see down to the opposite end of this hose. Once you have found it, you can attempt to pop up the pin to remove it. However, ( if you can not get any sort of screw driver back in that area, feed a wire down through the peep area and hooked it around the wire clip. Then pulled up.)
Finally, once you have gotten these 5 hoses off, you can remove the thermostat and water pump.
14. Start with the thermostat because it is above the water pump. Unplug the sensor attachment clip from the top of the thermostat. Remove the four bolts (3x 10mm and 1x 13mm). Pull off the thermostat, you have to turn the right side downwards because there is a metal arm that kind of holds it in.
15. Remove the water pump pulley. There are 4x 10mm bolts attaching it on. Have someone help you by holding the pulley still, because it will turn when you try to take out the bolts. This shouldn't be hard because the bolts are not torqued on tight at all. Once the four bolts are out, pull off the pulley.
16. Take out the water pump. Remove the 4x 10mm bolts. The pump will most likely be stuck on, so screw in two (one on each side) M6 (6 mm metric bolts) 25 mm in length (about), into the two side holes on the pump (they are the two that you didn't take any of the bolts out before). You want to thread these bolts in until they make contact with the engine block, once they do, continue screwing them in EVENLY. This will pry the water pump out of the engine block.
17. OK the dreadful Expansion Tank. Unplug the coolant level sensor plug. You can remove that if you want but there is a new one in the kit. Everything should now be disconnected from the tank so, if you're lucky, get about it and grasp it from underneath or however you can handle and pull it up. (if this does not work, have someone beat if from the bottom with a hammer while you pull it upwards).
Now you've got everything removed. This is sort of the mid-way point of the job. You've already gotten basically ALL of the HARD work done and the rest will got 2324352428432 times faster. Take a lunch break.
18. Flush out the the engine. Roll your car outside and use a water hose to spray through the engine to flush it out good. Spray through the thermostat and water pump openings. Remember to flush out the radiator too, unless you are replacing as well.
Flush the system with DISTILLED water again.
Next install everything back in REVERSE order that you took them out. Lubricate all fittings and attachments with diluted coolant to make them slip easier.
19. Putting the new expansion tank back in is almost as hard as taking it out. If you can muscle in the two fittings at the bottom into the tank, you're lucky. If not, remove the whole bracket which the tank attaches to so that you can put it on outside of the car. To remove the bracket, there was just Torx T-25 screws, one at the top right and one at the bottom. Use a rubber mallet to beat on the fittings to the new tank, while someone holds it. Reinstall the bracket and tank the same way as you took it out.
20. Install the water pump. Lubricate the O-ring and slide it in. Tighten the nuts back on and torque to 10 Nm (about 7 ft/lbs).
21. Install the pulley back on. Have someone hold it for you while you thread and tighten the four bolts back on. Torque them to 10 Nm (7 ft/lbs). Do not over tighten because the pulley is plastic.
 |
| Belt Configuration lol |
22. Install the thermostat. Lubricate the gasket with coolant and place it in. Again turn it a bit to get it around that little arm. Put the four bolts in and tighten them (can't find a torque spec right now but remember how hard they were on). Remember to reattach the plug.
 |
| New Thermostat and Water Pump |
23. Install all the hoses. Very simple and way easier than taking them out. Just remember which ones go where and remember to have the wire clip pulled up and then push it down once the fittings are attached all the way. Just reverse the process of how you took them out.
23a. On the lower radiator hose, take the new fan switch. There will be an O-ring in the box with it. Lubricate it up and put it on the fan switch. Put it in the place for it on the new lower radiator hose. Install the hose and reattach the plug to the fan switch.
24. Once you've got all of the new parts installed, flush the system out again with distilled water. Pour it into the expansion tank and let it drain out.
25. Don't forget to close back up the drain plugs. Go back under the car and install the engine drain plug. Torque this to 25 Nm if you can get a torque wrench to it. Install the new radiator drain plug. Retighten the explansion tank drain plug. Not super tight at all, just until you can't turn them anymore with out forcing them.
26. Once you've got those all attached, reinstall all the other junk; cabin air filter housing, air intake parts including MAF sensor, fan (remember to plug in the two plugs again.)
After all this stuff is reinstalled, start the coolant fill and bleed process.
Directions:
- Mix 50/50 OEM coolant with distilled water (1 Gal + 1 Gal) 2 gallons in total.
- Set ignition to ON (engine off) position, set the heater fan to lowest speed and temp setting to max (91 degrees) this will open the heater valve for proper bleeding.
- Slowly pour mixed coolant inside expansion tank until bubble free fluid emerges from bleed plug.
- Screw bleed valve in place
- Start engine and allow it to operate until warm (thermostat opens)
- Watch for any leaks and also watch the temp gauge. If it goes beyond middle, turn engine off and check for air pockets and re-bleed system.
**Extra Notes via dukedkt442 :
When torquing the waterpump nuts back down on it's studs, the threads of one of the nuts may break off the nut at only 50 in-lbs. of torque. I had to run up to the hardware store and grab 4 M6 nuts and washers, so that I could replace all four. Total cost: $2.61. I would recommend picking those up before hand, so that if you need them, you'll have them, and not having your work stop because the hardware store is closed/inaccessible.
-Break loose the 4 bolts that hold on the waterpump pulley BEFORE removing the belt. The belt will hold the pulley for you. Re-installation is the reverse; get the belt on before torquing them down (89 in-lbs).
-Removing the waterpump would be ridiculously difficult and risk major damage to the aluminum block without the use of the M6 6mm bolts. Use them!
-Don't even waste your time trying to remove the expansion tank from its bracket inside the car; take the 2 tor-x screwed out from the bracket, and remove the whole thing. Once out of the car, the tank easily pops right off. Put it on the bracket outside of the car, and slide it back in, replacing the 2 tor-x screws. Total time: 15-20 minutes. Just remember to disconnect the water hose and level sensor wire from the bottom of the old tank before attempting to remove it with the bracket attached.
-You don't have to worry about draining the block; I didn't replace the radiator, but even if I did, I wouldn't have had to drain the block of coolant. Drain the radiator and expansion tank. I cracked those two drain valves, then removed/replaced the waterpump and thermostat while they were draining. Also remember: if you don't drain the block, you won't be draining 2 gallons of coolant out, which means you won't be putting 2 gallons of coolant back in. I had a "DUH" moment when wondering why I had a 1/2 gallon of coolant mix leftover.
-Do yourself a favor and order the bleeder screw; the BMW part is $3.xx, with other brands being less than half that. Mine snapped in half and required some delicate surgery to extract AFTER I had the system refilled and the engine running, so the car is O.O.S. until the new one comes in. Because I ordered it separately (today, after breaking the old one) I had to pay $11 shipping for a $1.47 part. Save the money, and include it in the order and not pay the extra shipping.
Enjoyeth.